

How to Make Nail Polish Last Longer: Tested Tips and Tricks
To make nail polish last longer, the most effective strategy is to dehydrate the nail plate with an alcohol wipe or vinegar to remove natural oils before application. Dermatologists recommend adhering to the following core principles:
- Use a “sticky” rubberized base coat.
- Apply polish in three ultra-thin layers.
- Always “cap” the free edge of the nail.
- Re-apply top coat every two days.
Now, let’s be honest—we have all been there. You spend an hour painting your nails to perfection, only to discover a chip while typing at work the very next morning. It is a universally frustrating experience. While gel manicures offer longevity, they can be costly and harsh on your nail health. But precisely speaking, you can get that same salon-quality durability with your regular polish at home.
Realistically, the secret to a long-lasting manicure isn’t just about the brand of polish you buy; it is about the science of application. Whether you are preparing for a vacation or simply want your hands to look elegant for work, mastering a few key techniques can change everything.
In this comprehensive guide, we will break down the exact steps to extend your manicure lifespan. From proper nail plate preparation to the final top coat strategy, here is everything you need to know to keep your nails looking fresh, shiny, and chip-free for up to two weeks.
The Science of Adhesion: Medical Insights from Dermatologists
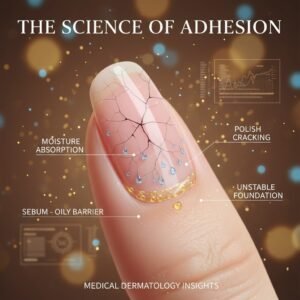
Before we dive into the step-by-step routine, it is essential to understand the biological reasons why polish fails. According to leading experts in dermatology, the primary culprit for chipped nails is moisture and oil.
Specifically, Dr. Dana Stern, a board-certified dermatologist and assistant clinical professor of dermatology at the Mount Sinai Medical Center in New York, emphasizes two major factors:
- The Porous Nail Plate: The nail acts like a sponge, absorbing water and expanding. When it dries and contracts, the rigid polish cracks.
- Natural Oils: Sebum from the skin creates a slippery barrier, preventing the polish from gripping the keratin.
Furthermore, the American Academy of Dermatology (AAD) suggests that nail health plays a vital role in polish retention. Brittle or peeling nails provide an unstable foundation. Therefore, to ensure the best results, you must focus on creating a surface that is both chemically balanced and physically smooth.
Phase 1: Essential Prep Work for Nail Plate Longevity
Undoubtedly, the most critical part of a manicure happens before you even open the polish bottle. If you skip prep, you are setting yourself up for failure.
1. The “Waterless” Manicure Technique
Traditionally, many salons soak your fingers in a bowl of warm water. However, this is a major mistake for longevity. As mentioned by medical experts, water causes the nail plate to swell. To avoid this issue:
- Skip the soak: Keep your nails dry.
- Use a remover cream: Use a liquid cuticle remover to soften dead skin.
- Push gently: Push back cuticles without damaging the nail matrix.
2. Buffing to Remove Surface Ridges
Naturally, our nails have oils and uneven ridges. Gently buffing the surface creates a very slight texture, which gives the base coat something to grip onto. However, precision is key here:
- Use a high-grit buffer (very soft).
- Apply light pressure to remove surface shine only.
- Avoid over-buffing, which can thin and weaken the nail plate.
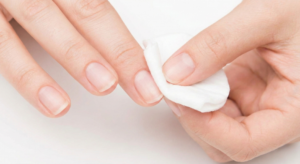
3. The “Dehydration” Hack with Alcohol
Surprisingly, even after washing and drying, your nails still hold natural oils and residue from soaps. These oils act as a barrier, preventing adhesion. Here is the fix:
- Take a lint-free wipe soaked in rubbing alcohol (isopropyl alcohol) or white vinegar.
- Swipe it thoroughly across each nail plate and under the tip.
- Wait 5 seconds for it to evaporate completely. This step ensures the purest possible bond between your nail and the polish, making it the single most effective trick to make nail polish last longer.
Phase 2: Application Secrets for a Flawless Finish
Once your nails are prepped and dehydrated, the application process requires patience and precision. The goal is to build a strong, flexible structure.
4. Why a Sticky Base Coat is Non-Negotiable
Technically, regular nail polish is not designed to stick directly to the natural nail; it is designed to stick to a base coat. Ideally, you should look for products labeled as:
- “Rubberized”
- “Sticky”
- “Bonding” These formulas are engineered to be flexible, acting as a shock absorber that bends with your natural nail rather than cracking.
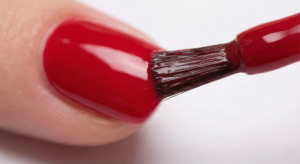
5. The “Thin is In” Layering Strategy
Commonly, people try to get full opacity in just one thick coat. This is a recipe for disaster because thick layers trap solvents and lead to peeling. Instead, follow this layering rule:
- Coat 1: Apply a very sheer, thin layer (it may look streaky, that’s okay).
- Coat 2: Apply a second thin layer to build color.
- Coat 3: Apply a final thin layer for full opacity. Allow each layer to dry for at least two minutes before applying the next.
6. Capping the Free Edge (The Pro Tip)
Crucially, the tip of your nail (the free edge) takes the most abuse—from typing on keyboards to opening cans. To protect this vulnerable area, you must “cap the free edge” by:
- Dipping the brush slightly.
- Running the brush horizontally along the very tip of the nail.
- Doing this for every layer (Base, Color, and Top Coat). This simple motion prevents water from seeping underneath the layers and stops the tip from wearing away.
The “Pro Secret”: Running the brush horizontally along the very tip (free edge) of the nail seals the layers, preventing water from lifting the polish and stopping tip wear.
7. Avoid Flooding the Cuticles
Unfortunately, if polish touches your cuticle or the skin around the nail, it will lift. As the polish on the skin dries, it separates, creating a gap where water can enter.
- Leave a tiny gap (about 1mm) between the polish and your cuticle.
- If you make a mistake, dip a small angled brush in pure acetone and clean it up immediately.
Phase 3: Post-Manicure Maintenance and Protection
Your job isn’t done once the nails are dry. Maintenance is the key to pushing your manicure from 3 days to 10 days.
8. The “Top Coat” Refresh Routine
Eventually, even the best polish wears down due to friction. A top coat acts as a shield. To extend the life of your manicure:
- Day 1: Apply a quick-dry top coat to seal the color.
- Day 3 & 5: Re-apply a thin layer of top coat to restore shine and strength.
9. Cool Air Drying Only
Mistakenly, many people use hair dryers on high heat to speed up the drying process. Heat keeps the polish solvents active and soft.
- Do: Use the “cool” setting on your hair dryer or a fan.
- Don’t: Dip nails in ice water (this causes shrinkage and cracking).
10. Wear Gloves for Household Chores
Practically speaking, water and chemicals are your manicure’s worst enemies. Dish soap is designed to strip grease, and it will strip the oils from your polish just as easily. Always wear rubber gloves when:
- Washing dishes.
- Cleaning the bathroom.
- Using harsh chemicals or gardening.
Phase 4: Lifestyle Habits for Nail Health
Beyond the polish itself, how you treat your hands daily impacts how long your manicure survives.
11. Treat Nails as Jewels, Not Tools
We are all guilty of using our nails to peel off stickers or open soda cans. Consciously stop using your nails as tools. Instead, use:
- A spoon or a knife to open cans.
- Your finger pads (not tips) to press buttons.
12. Keep Cuticles Hydrated with Oil
Interestingly, polish becomes brittle as it ages on the nail. Apply cuticle oil or Jojoba oil daily. This keeps both the skin and the polish flexible, preventing them from snapping upon impact.

Frequently Asked Questions
| Question | Answer |
| 1. What nail shape is Gen Z? | Gen Z mostly prefers short almond, squoval, and natural rounded nails—simple, clean, and low-maintenance. |
| 2. How long do painted nails last? | Regular nail polish lasts 5–7 days, while gel polish lasts 2–3 weeks with proper care. |
| 3. How do you extend the life of nail polish? | Apply a base coat, thin layers of polish, seal with a top coat, and avoid excessive water exposure. |
| 4. How to keep nail polish from chipping? | Cap the nail tips, wear gloves for chores, and reapply a top coat every 2–3 days. |
| 5. What nail shape is most attractive? | Almond and oval shapes are considered most attractive because they make fingers look longer and elegant. |
| 6. How to make nail polish last longer? | Clean nails properly, use quality products, apply thin coats, and finish with a strong top coat. |
Conclusion
Ultimately, achieving a chip-resistant manicure at home is entirely possible without professional tools. It simply requires a shift in mindset—treating the process as a scientific routine rather than a quick paint job.
By prioritizing the “waterless” prep method, dehydrating the nail plate, applying thin layers, and rigorously capping the free edge, you can transform your home manicures. Remember, the goal is to create a bond that withstands daily wear and tear.
So, the next time you sit down with your favorite bottle of red or nude, follow these 12 expert-approved steps. Not only will you save money on salon visits, but you will also enjoy the satisfaction of knowing exactly how to make nail polish last longer than ever before.


2 thoughts on “How to Make Nail Polish Last Longer: Tested Tips and Tricks”